skip to main | skip to sidebar

Search

About me

Rachael
I'm a genetics student who is obssessed with makeup. I hope to share tips and tricks I have learned and reviews of products I have tried!
View my complete profile

Labels

  • MAC (4)
  • Urban Decay (1)

Archive

  • ▼ 2009 (12)
    • ► April (1)
    • ▼ March (7)
      • My MAC Palettes
      • MAC Grand Duos Review
      • April MAC Collection: Colour Ready
      • Upcoming Posts...
      • Glitzy-Glam.com
      • Urban Decay Primer Potion Magic Trick
      • Review: Studio Sculpt Foundation
    • ► February (4)
  • Home
  • FAQ
  • Contact

xShadowyLadyx

Beauty tips, tricks, hauls, reviews and more!

My MAC Palettes

Monday, March 30, 2009

I thought I would do a blog post showing my MAC palettes so I can show how I organize them and what colours I have. I don't have many yet, but I do have quite a few for someone who only started buying MAC in July :) I only have 3 palettes so far and there are a number of empty spaces in them, but I imagine they will be filled quite quickly!


Neutrals
Left-Right Top Row: Solar White, Blanc Type, Mylar
Middle: Naked Lunch, Ricepaper, Kid, Bronze
Bottom: Cordoroy, Satin Taupe


Blues/Greens/Greys/Blacks
Top: Tilt, Juxt, Electra, Scene
Middle: Flashtrack, Steamy, Sumptuous Olive, Black Tied
Bottom: Prussian, Cool Heat, Humid, Carbon


Pinks/Purples
Top: Yogurt, Seedy Pearl, Digit
Middle: Girlie, Da Bling, Beautiful Iris, Fig. 1
Bottom: Passionate, Cranberry, Nocturnelle, Sketch


Posted by Rachael at 11:57 PM 0 comments  

MAC Grand Duos Review

Friday, March 27, 2009


Thanks to the new camera I was finally able to take some pictures of the Blush Duo that I got. All in all I think this was a really nice collection they came out with. They came out with 7 mineralized blush duos. One half is a solid colour and the other half is a complementary marbelized colour. The pigmentation in these is really great, so you don't need to be constantly sweeping your brush over it to get a decent enough product. They are shimmery, but it is not chunky glitter. It just has a highly frosted appearance. The colours were gorgeous but I only picked up one. Being fairly pale, I felt that all the bronze/brown tone duos were too dark for my skin tone although on many others I think they would look great. I picked up Moon River which is the lightest one they had. This is a very pale pink with the marbelized side coming off an almost pale white gold. It might not work on darker skin tones as a blush because it is so light but you could probably use it as a highlight.

There are so many methods to apply these, from using the 188 to the 187 or using a blush brush. Using them separately or both together. It's really about personal preference and whatever you feel like doing! My favourite way to apply is to take my 187 and swirl it over both halfs to get a combination of the two colours. I apply that to my cheeks and then go back with my 168 and grab some of the marbelized side for some extra highlight on top of my cheeks.


I think this collection is worth checking out although I would suggest going to see it in person and swatching them for yourself since it can be hard to judge online what they truly look like.


Promo Image: Specktra.net


Posted by Rachael at 1:37 PM 0 comments  

Labels: MAC

April MAC Collection: Colour Ready

Wednesday, March 25, 2009


Here is the first upcoming MAC collection for the month of April! It is set to release April 2nd in the US and Canada. This is a fairly small collection by MAC standards and contains mostly items that are already in the Permanent or Pro line. The focus seems to be on 3 new products, two of which will be Perm and one will be Limited Edition (LE). There are two skincare items which have been developed with the idea of preparing and improving the skin for makeup, likely where the collection name "Colour Ready" came from . I'm especially excited to try the Prep+Prime Refined Zone since its main purpose is minimizing pores which I could alway use! I love the promo pic for this collection, the model's makeup is creative and striking, although the navy blue they used on her doesn't seem to be a part of this collection! So I'm curious about which product they used for that. I definitely have high hopes for the skincare items and hope I won't be disappointed!


Lipstick - (Perm)
Show Orchid - Vivid hot pink (Amplified Creme) (Perm Pro)
Impassioned - Amped-up fuchsia (Amplified Creme) (Perm)


Eye Shadows - (Perm)
Bitter - Vivid bright golden green flecked with shimmer (Velvet) (Perm at MAC stores and MACcosmetics.com)
White Frost - Vivid bright white with icy shimmer (Frost) (Permanent)


Penultimate Liner (Perm)

Rapidblack - True black Brow Pencil -


Brow Pencil (Perm)

Stud - A deep rich blackened brown Brush -


#129SH: Short-Handled Blush/Powder Brush - (Perm)
-Includes a travel pouch to keep your brush clean. This brush is particularly good for blush application. The fibers are soft and form a full, rounded shape.


Prep + Prime Transparent Finishing Powder - (PERM)

A lightweight, colourless, loose powder that works well on any skin tone. It is formulated with special optics and ingredients that help add dimension and creaste a blurring effect. The silky powder helps set and stabilize makeup and works well with all MAC foundations. It can also be worn on bare, moisturized skin for a natural, "fresh-faced" look. This finely milled powder feels virtually weightless on the skin. It creates a sheer, invisibleveil on the skin, helping to minimize the appearance of unwanted shine and leaving skin looking flawless. It is dermatologist-tested, non-acnegenic, and safe for use by contact lens wearers.


Prep + Prime Line Filler - (PERM)

Instantly minimizes the appearance of fine lines and wrinkles on the surface of the skin. This cutting-edge formula dries down to a natural matte finish, making skin appear smoother instantly. The innovative formula incorporates technology that uses a combination of corn kernel extract and acetyl hexapeptide-8 that helps to firm the skin and boost the skin's natural collagen production. The formula also incorporates technology which helps to relax the look of facial tension and expression lines. A combination of key ingrediens form white spherical powders that optically blur the appearance of fine lines. When used over time, the natural collagen boosters incorporated into the formula significantly improve the firmness of the skin and help to minimize the appearance of fine lines. It is dermatologis-tested, non-acnegenic, and suitable for all skin types.


Prep + Prime Skin Refined Zone - (LE)

A lightweight emulsion that helps control sebum (oil) and shine on the skin's surface and immediately reduce the appearance of pores on the skin. It dries down to a natural-looking, natural-matte finish. Over time, it genlty exfoliates the skin, helping to unclog pores, keeping them clean, clear and less visible. It also helps to improve skin tone over time and provides a smooth, even surface for improved makeup application. For daytime use, apply it over your fave mac moisturizer and under other p&p products and foundation. For nighttime use, it should be applied to cleansed skin before moisturizer. It is dermatologist-tested and appropriate for all skin types.


Source: Specktra.net

Posted by Rachael at 10:37 PM 0 comments  

Labels: MAC

Upcoming Posts...

So here is just a post to let you know what is coming up on the blog! I bought a new camera and will be getting it tomorrow so then I can take pictures of some the things I have gotten. My old camera wasn't the greatest which explains the lack of posts! So in the near future there will be....

  • NYX Jumbo Eye Pencil Review and Swatches
  • Urban Decay 24/7 Liner Review and Swatches
  • MAC Grand Duos Review
  • Upcoming MAC collections for April

And that's about it! I'm hoping to start a Youtube channel soon, we'll see how that turns out. I'm limited by space and lighting I have right now, so it might be easier to wait until I move home permanently to do videos. Right now, I'm away at school and it isn't the best set up, but I'll see if I can fix it up.

Posted by Rachael at 2:14 PM 0 comments  

Glitzy-Glam.com

Friday, March 13, 2009

After watching a new video of MakeupbyTiffanyD's, I found out about this website. It's actually run by another youtube guru Allthatglitters21. They have really great original makeup bags and lots of other cool and cute items for great prices. They also ship worldwide so no one misses out. Definitely check it out! The website is www.glitzy-glam.com.

Posted by Rachael at 7:24 PM 0 comments  

Urban Decay Primer Potion Magic Trick

Monday, March 2, 2009

I sawed it in half! Ta-da! Right so lame-o intro but I bet it got your attention ;)
I've had my beloved Urban Decay Primer Potion (affectionately known as UDPP) for a while now, I got it in the summer sometime and I am surprised it has lasted me even this long. But as of late I've noticed the applicator bringing me less and less of that creamy beige goodness. I didn't want to believe it...I was running out. Now I am a poor university student and did not relish the thought of going and buying another one. So after hearing all of the makeup urban legends about busting upon the packaging and finding treasure troves of UDPP, I decided to try it myself. If it saves me $16 what's the harm in trying?

I heard the warnings about close mishaps and how people almost lost their fingers frantically cutting into the packaging, so I was apprehensive. But it really is not as dangerous as these people have made it out to be. But I do have a few suggestions that will make this process easier and safer for you.

Tips:
1. Get a sharp medium sized knife (mine got kind of dull so don't use a good knife or your mom's good kitchen knife because she will probably want to use it on you for ruining it :P )

2. Use a cutting board. It helps prevent the UDPP from rolling all over the counter.

3. Don't go all out and start hacking it to bits. Use slow back and forth motions, like sawing wood, while keeping a firm grip on the packaging with your fingers as far as possible from the blade.

4. Don't try and saw really fast and don't press down as hard as possible. You do need some pressure but if you press too hard, or go to fast, the knife will slip and this increases the risk of injuring yourself.

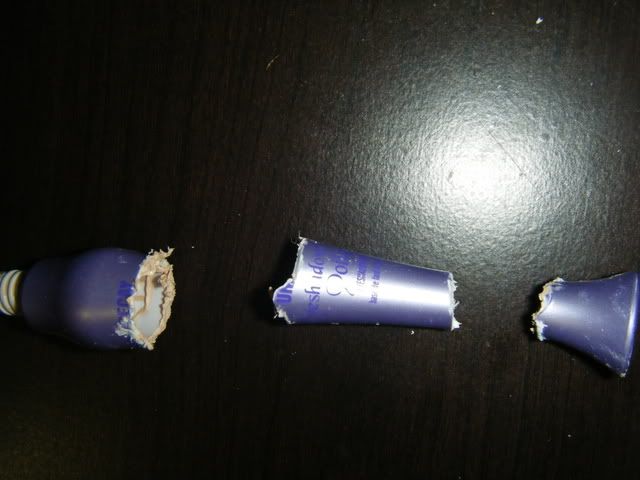
5. Don't cut the tube lengthways, it will be too hard to hold on to. Instead, cut it into three sections (see pictures).

6. Be patient! It does take some time to saw enough through the packaging to bend it open and get all the product. But you will be rewarded :)

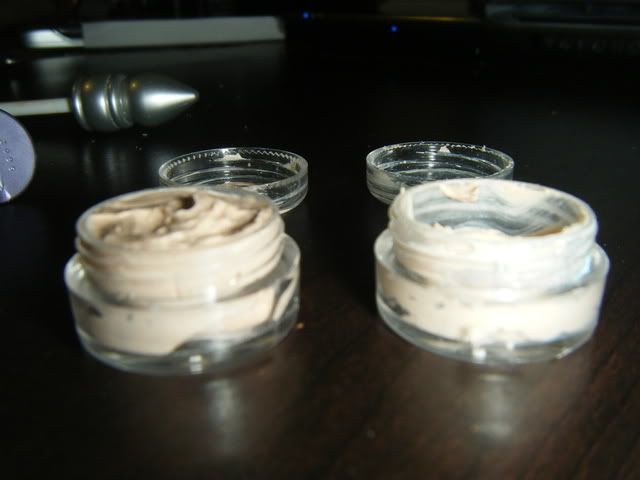
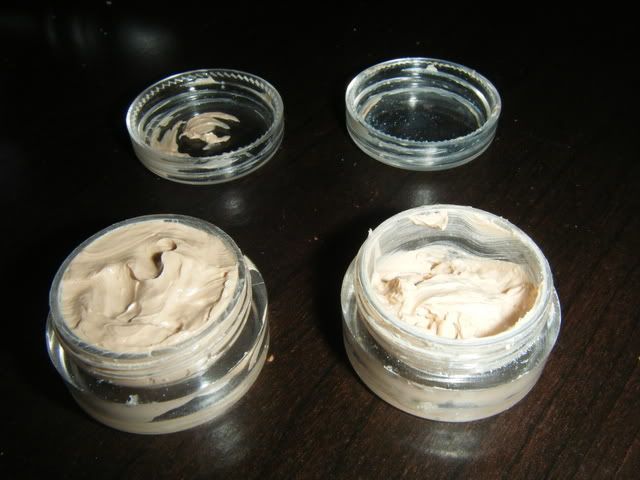
I was rewarded with a TON, seriously, a TON of extra product. As you can see from the pictures it was not a meager amount that was stuck in all the packaging crevices. So it is definitely worth it to go all Texas Chainsaw Massacre on your UDPP. I did however get a hand cramp and will be billing Urban Decay for hand physio ;) I am very seriously considering switching to Too Faced Shadow Insurance though, while this escapade turned out to be worth it in the end that is because I had already paid for the UDPP. I would much rather have a product where I didn't have to work for my moneys worth.

Photobucket
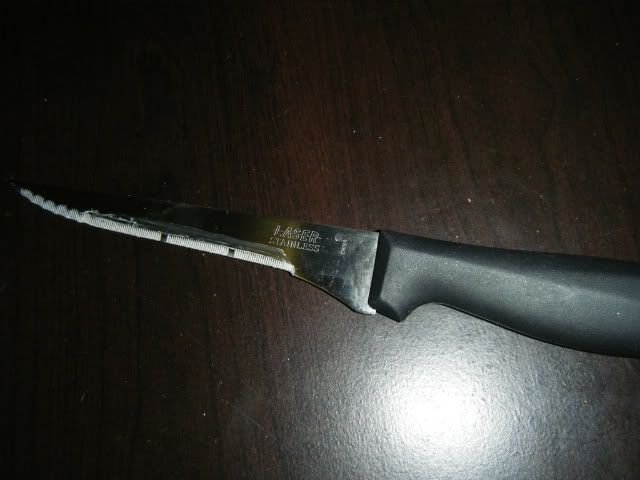
The knife I used (in the aftermath, you can see it has been used)


Photobucket
The remnants of the pretty potion bottle

Photobucket
UDPP jackpot

Photobucket
The jackpot from a more attractive angle.

Posted by Rachael at 9:13 PM 1 comments  

Labels: Urban Decay

Review: Studio Sculpt Foundation

Sunday, March 1, 2009


So I bought MAC's Studio Sculpt Foundation about two weeks ago so I have really had a lot of chances to try it out and see what I think of it. Previous to this I was using MAC Studio Fix Fluid foundation.


Just to compare amounts and prices, Studio Sculpt is 40 mL and is $33.50 whereas Studio Fix is 30 mL and is $31. So there is only a very slight price difference and you are getting more product with Studio Sculpt.


On to packaging, Studio Fix comes in a glass bottle and for ease of use it is best to buy a foundation pump to go along with it. Although, then the cap doesn't fit over the foundation pump so you either have to take the pump out, clean it, and put the cap on for travelling or just remember to close the pump. Studio Sculpt really has SF beat on packaging. It comes in a squeeze tube so it is much easier to use.


Studio Sculpt is a gel-based foundation so it has a much thicker consistency than any of the other liquid foundations. It's very smooth and creamy. You also need much less product. With Studio Fix I usually take about two pumps to do my entire face, but with Studio Sculpt I can do my whole face with medium coverage in one squeeze of the tube.


Studio Sculpt gives great coverage and it doesn't have a really cakey look to it even when building it up for heavier coverage. Personally I think it has a slightly heavier or stickier feel to it than the Studio Fix. But it is only very slight and not enough to make me dislike the product.


I have heard that many people have had to buy darker shades with this product but I bought the same shade I have in Studio Fix and it worked great for me. I am an NW15 and as many people know, Studio Fix runs a little dark so the NW15 in Studio Sculpt actually matched me better. It is still a little dark though, so I would love to see MAC get into some much lighter shades of foundation.


All in all though I think this foundation is a great product and I would definitely recommend it to anyone thinking of buying it!

Posted by Rachael at 4:20 PM 0 comments  

Labels: MAC

Newer Posts Older Posts Home
Subscribe to: Posts (Atom)

Blog Design by Gisele Jaquenod

Work under CC License.

Creative Commons License